OK. First, I didn't ever plan to write a tutorial on
semi-transparent images. There are some really good ones around,
and I suggest you read them first. This is because they will
help you understand how semi-transparent images work, and then
you will know the limitations of this method.
This method will only produce faded graphics at various levels,
and not gradient fades.
Transparent Graphics in PowerPoint
PowerPoint and Alpha Channels
Adam's Transparency Tutorial
Bitmap Size
OK, so the last one wasn't about
semi-transparent images.
But it is still very important to know.
The trick behind this tutorial is that you can produce various
levels of semi-transparent images for applications right within
PowerPoint, save them, and keep them for reuse. But version XP
only.
How?
1. Draw a rectangle, and makes its fill the picture you want
(there should be enough material elsewhere on this site for you
to know how. After all,, if I keep telling you, you will never
have to remember yourself. Besides, I am running out of web
space).
2. Get rid of the outside line of the rectangle.
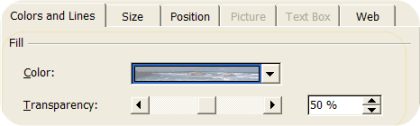
3. Set the image to be at what ever level of transparency you
want. Mine are 50%.
You do this by right clicking on the autoshape, select Format
Autoshape, and it is under the colour and lines option.
You now click OK enough times to set all of these options. Then,
4. Right click on the image and select "Save as Picture".
Depending on the type of file you save it as, the image
transparency will remain intact for later use. Now to the
research to explain the best file type to save as.
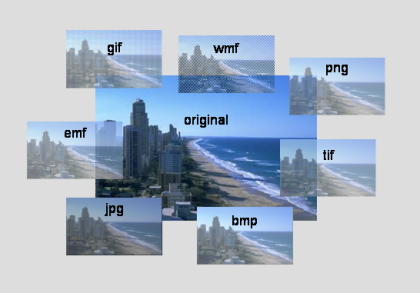
The image shows the original and then the formats available to
save to within PowerPoint. Note the resultant images were shrunk
to be smaller than the original for display purposes. Now,
forget bmp and jpg straight away, as the transparency does not
stay intact. After that, there are some options that are better
than others.
|
File
type
|
Output
|
Size
|
| Gif |
2 channels |
Small |
| jpg |
RGB |
Small |
| png |
RGB + Alpha |
OK |
| tif |
RGB + Alpha |
OK |
| BMP |
RGB |
Bigger |
| wmf |
RGB + Something? |
Big |
| emf |
RGB + Grey |
Biggest |
RGB? A mix of red, green and blue. The plus something? Who cares
<g>.
Now, as I said, forget jpg and bmp as far as transparency is
concerned. Also forget gif as the output is a mess. In my
opinion, wmf and emf, while they work with
semi-transparent images,
are too big in file size.
Tif is excellent, but for best file size and acceptable display
results with semi-transparent images, my recommendation is png.
It will also display well in PowerPoint.
So, if you have PowerPoint XP, you can
produce semi-transparent images that are transferable to other
applications. Handy to know.
© Glen Millar
Last Updated: April 02, 2005
